
With Stock Transfer you move stock from one location to another, or to another warehouse. A transfer has two phases:
-
Get: you take stock from a source location. The stock is then held under the transfer.
-
Put: you place the stock you took on a target location.
One transfer can collect stock from several locations and items. A task is one stock transfer document. You only see your own transfers.
Step by step
1. Choose Task (screen Stock Transfer - Choose Task)
The list shows your open transfers. Tap a transfer or type its number. When you have no open transfers, this screen is skipped and a new transfer starts.
-
F2 New: start a new transfer. The document is created when you save the first get line.
-
F1 Return: back to the main menu.
When you open a transfer that still has stock to put away, you go straight to step 6.
2. Source location (screen Stock Transfer - Get - Bin)
Scan the source location. It must be active and be in a warehouse that your task group allows.
-
F2 Put: go to the put phase (step 6). Only shown when the transfer holds stock to put away.
-
F1 Return: leave the application. When the transfer still holds stock to put away, you get a message that you must first put all lines away; Continue takes you to step 6.
3. Get overview (screen Stock Transfer - Get - Overview)
The free stock on the location is shown per line. Tap a line or scan an item barcode. When a barcode matches several lines, you choose the right line (Stock Transfer - Get - Choose Line). When there is no free stock, you get a message and go back to step 2.
When the stock you choose is reserved as preferred stock, you get a warning. Continue takes it anyway; Abort goes back.
-
F2 All: take all stock on the location in one go (only when this is enabled).
-
F1 Return: back to step 2.
4. Quantity, batch or serial number (get)
-
Stock Transfer - Get - Quantity: enter the quantity, up to the free quantity.
-
Stock Transfer - Get - Batches: choose a batch, then enter the quantity. F2 All takes all batches (when enabled).
-
Stock Transfer - Get - Serials: scan or tap a serial number; each serial number is one piece. F2 All takes all serial numbers (when enabled).
5. Save get line
The stock is now held under the transfer. When a report is set up, you can print a label. For batch and serial items you continue with step 4 while there is stock left. Then, depending on the settings, you go straight to the put phase (step 6) or back to step 3 to take more.
6. Put overview (screen Stock Transfer - Put - Overview)
The lines you still have to put away. Tap a line or scan an item barcode. When a barcode matches several lines, you choose the right line (Stock Transfer - Put - Choose Line).
-
F2 All: put all stock on one target location (when enabled).
-
F1 Return: back to step 2.
7. Target location (screen Stock Transfer - Put - Bin)
Scan the target location. It must be active and be in a warehouse that your task group allows.
-
F2 External: transfer to another warehouse without a location; you choose the warehouse from a list (when enabled).
-
F1 Return: back to step 6.
8. Quantity, batch or serial number (put)
-
Stock Transfer - Put - Quantity: enter the quantity.
-
Stock Transfer - Put - Batches: choose a batch, then enter the quantity. F2 All puts all batches away (when enabled).
-
Stock Transfer - Put - Serials: scan or tap the serial numbers. F2 All puts all serial numbers away (when enabled).
-
Stock Transfer - Put - Serials Outbound: for items that register a serial number on outbound, when the target is in another warehouse. Scan one serial number per piece.
F1 Return on these screens takes you back to step 7.
9. Save put line
The stock is moved to the target location. When a report is set up, you can print a label. When the line still has stock, you continue with step 8; otherwise you go back to step 6.
10. Finished (screen Stock Transfer - Finished)
When all stock is put away, the transfer is closed automatically. When a report is set up, you can print the document. Ok takes you back to step 1.
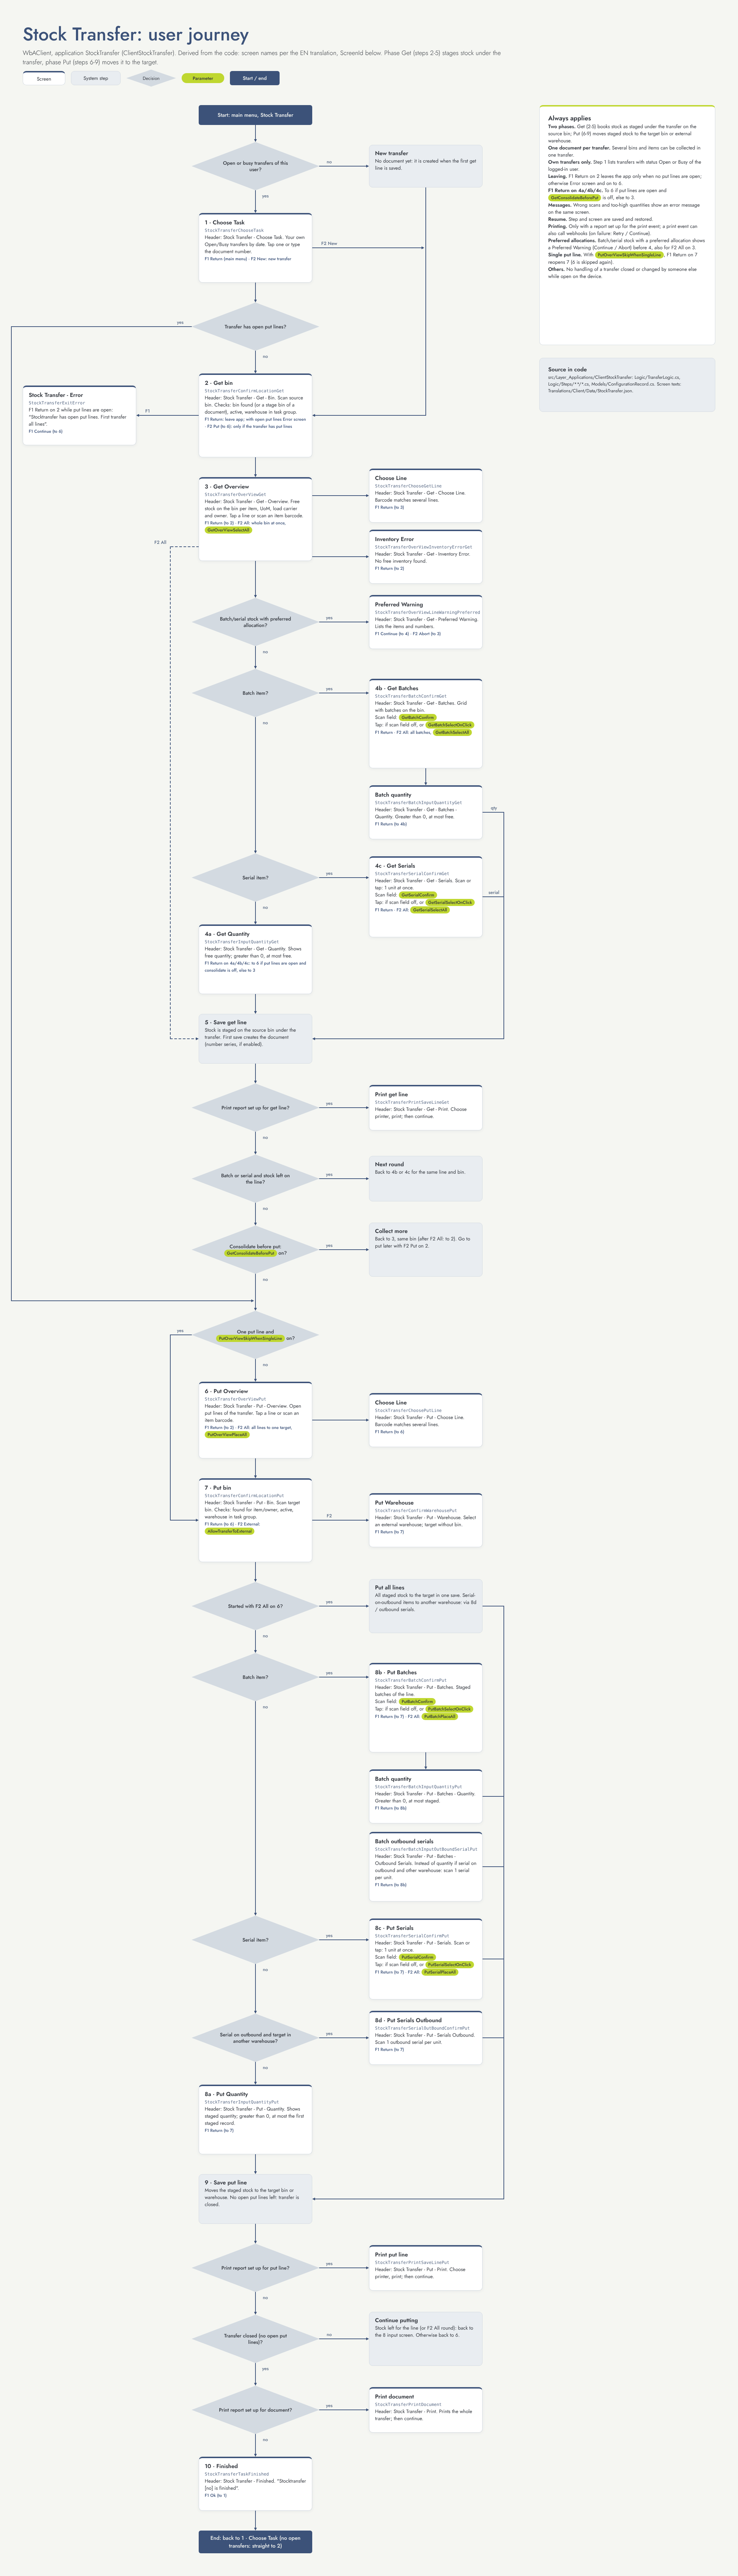
Flow diagram
Settings that change this flow
|
Setting |
Default |
Effect |
Step |
|---|---|---|---|
|
GetOverViewSelectAll |
Off |
Show F2 All on the get overview: take the whole location in one go. |
3 |
|
GetConsolidateBeforePut |
Off |
Off: after each get you go straight to the put phase. On: you first take everything, then go to put with F2 Put. |
2, 5 |
|
GetBatchConfirm |
On |
Show a scan field for the batch (get). When off, tap the batch in the list. |
4 |
|
GetBatchSelectOnClick |
Off |
Also allow tapping a batch while the scan field is shown (get). |
4 |
|
GetBatchSelectAll |
Off |
Show F2 All on the batch screen (get). |
4 |
|
GetSerialConfirm |
On |
Show a scan field for the serial number (get). |
4 |
|
GetSerialSelectOnClick |
Off |
Also allow tapping a serial number while the scan field is shown (get). |
4 |
|
GetSerialSelectAll |
Off |
Show F2 All on the serial screen (get). |
4 |
|
PutOverViewSkipWhenSingleLine |
Off |
When there is exactly one line to put away, skip the put overview. |
6 |
|
PutOverViewPlaceAll |
Off |
Show F2 All on the put overview: put all stock on one target. |
6, 7 |
|
PutBatchConfirm |
On |
Show a scan field for the batch (put). |
8 |
|
PutBatchSelectOnClick |
Off |
Also allow tapping a batch while the scan field is shown (put). |
8 |
|
PutBatchPlaceAll |
Off |
Show F2 All on the batch screen (put). |
8 |
|
PutSerialConfirm |
On |
Show a scan field for the serial number (put). |
8 |
|
PutSerialSelectOnClick |
Off |
Also allow tapping a serial number while the scan field is shown (put). |
8 |
|
PutSerialPlaceAll |
Off |
Show F2 All on the serial screen (put). |
8 |
|
AllowTransferToExternal |
Off |
Show F2 External on the target location: transfer to another warehouse. |
7 |
Other things that change the flow
-
Task groups: limit the warehouses of the source and target locations.
-
Number series: the transfer number comes from the Stock Transfer number series when it is enabled.
-
Item settings: batch, serial and serial number on outbound.
-
Preferred stock: shows a warning before you take it.
-
Print reports: print screens only appear when a report is set up, after each get line, after each put line and when the transfer is closed.