
With Picking you pick the lines of a pick list. Depending on the pick list you pick into carriers (pick-to-label), and at the end a delivery or packaging task is created.
Step by step
1. Choose Task (screen Picking - Choose Task)
The pick lists are sorted with urgent lists first, then by date. Tap a pick list or scan its number. F2 Filter appears when your task groups contain more than one base type. When someone else is already working on the list, you can team up. When the pick list has notes, the Details screen shows them first.
2. Carriers (screen Picking - Carriers, pick-to-label only)
For pick lists with pick-to-label, carriers are created automatically. This screen appears only when the setting to show carriers at the start is on.
-
F2 Continue: start picking.
-
F3 Print / F4 Print All: print the carrier labels (when a report is set up).
-
F5 Type: change the carrier type.
3. Choose Line (screen Picking - Choose Line)
The open lines are grouped per item and unit. Tap a line; scanning is not possible on this screen. When the line has notes, the Line Details screen shows them first.
-
F3 Order: pick all open lines in pick sequence (sort mode).
-
F4 Carriers: open the carriers screen (pick-to-label).
-
F5 Close: close the selected line (after confirmation).
-
F6 Finish: finish the pick list early, after the first pick.
When sort mode is on by default, this screen is skipped and you start picking straight away in pick sequence.
4. Confirm Location (screen Picking - Bins)
Scan the location that is shown. It must be the right location in the right warehouse. Lines without a stock allocation skip this step.
5. Confirm Item (screen Picking - Confirm - Item)
Scan the item barcode. Depending on the settings, the scanned unit must match the unit of the line. F2 Skip skips the confirmation, unless confirmation is mandatory.
6. Quantity, batch or serial number
-
Picking - Quantity: pick the quantity shown. You can pick less than the open quantity. F2 Change UoM switches to another unit, when allowed.
-
Picking - Batches: scan an allocated batch, then enter the quantity or scan the outbound serial numbers.
-
Picking - Serials: scan an allocated serial number; each scan is one piece.
-
Picking - Serials Outbound: scan the serial numbers that are registered on delivery; each scan is one piece.
7. Confirm Carrier (screen Picking - Confirm - Carrier, pick-to-label only)
Scan the suggested carrier, or another carrier that fits the same split. F2 New creates a new carrier.
8. Save pick
The pick is booked. The application then determines the next pick: another location brings you to step 4, another item to step 5, otherwise you stay on step 6. When the group is done, you go back to step 3.
9. Finished (screen Picking - Finished)
When the pick list is complete (or finished early), the application can ask the questions of a questionnaire, show the details again and print the delivery or packaging document. The finished screen shows which delivery or packaging task was created. Ok takes you back to step 1.
Flow diagram
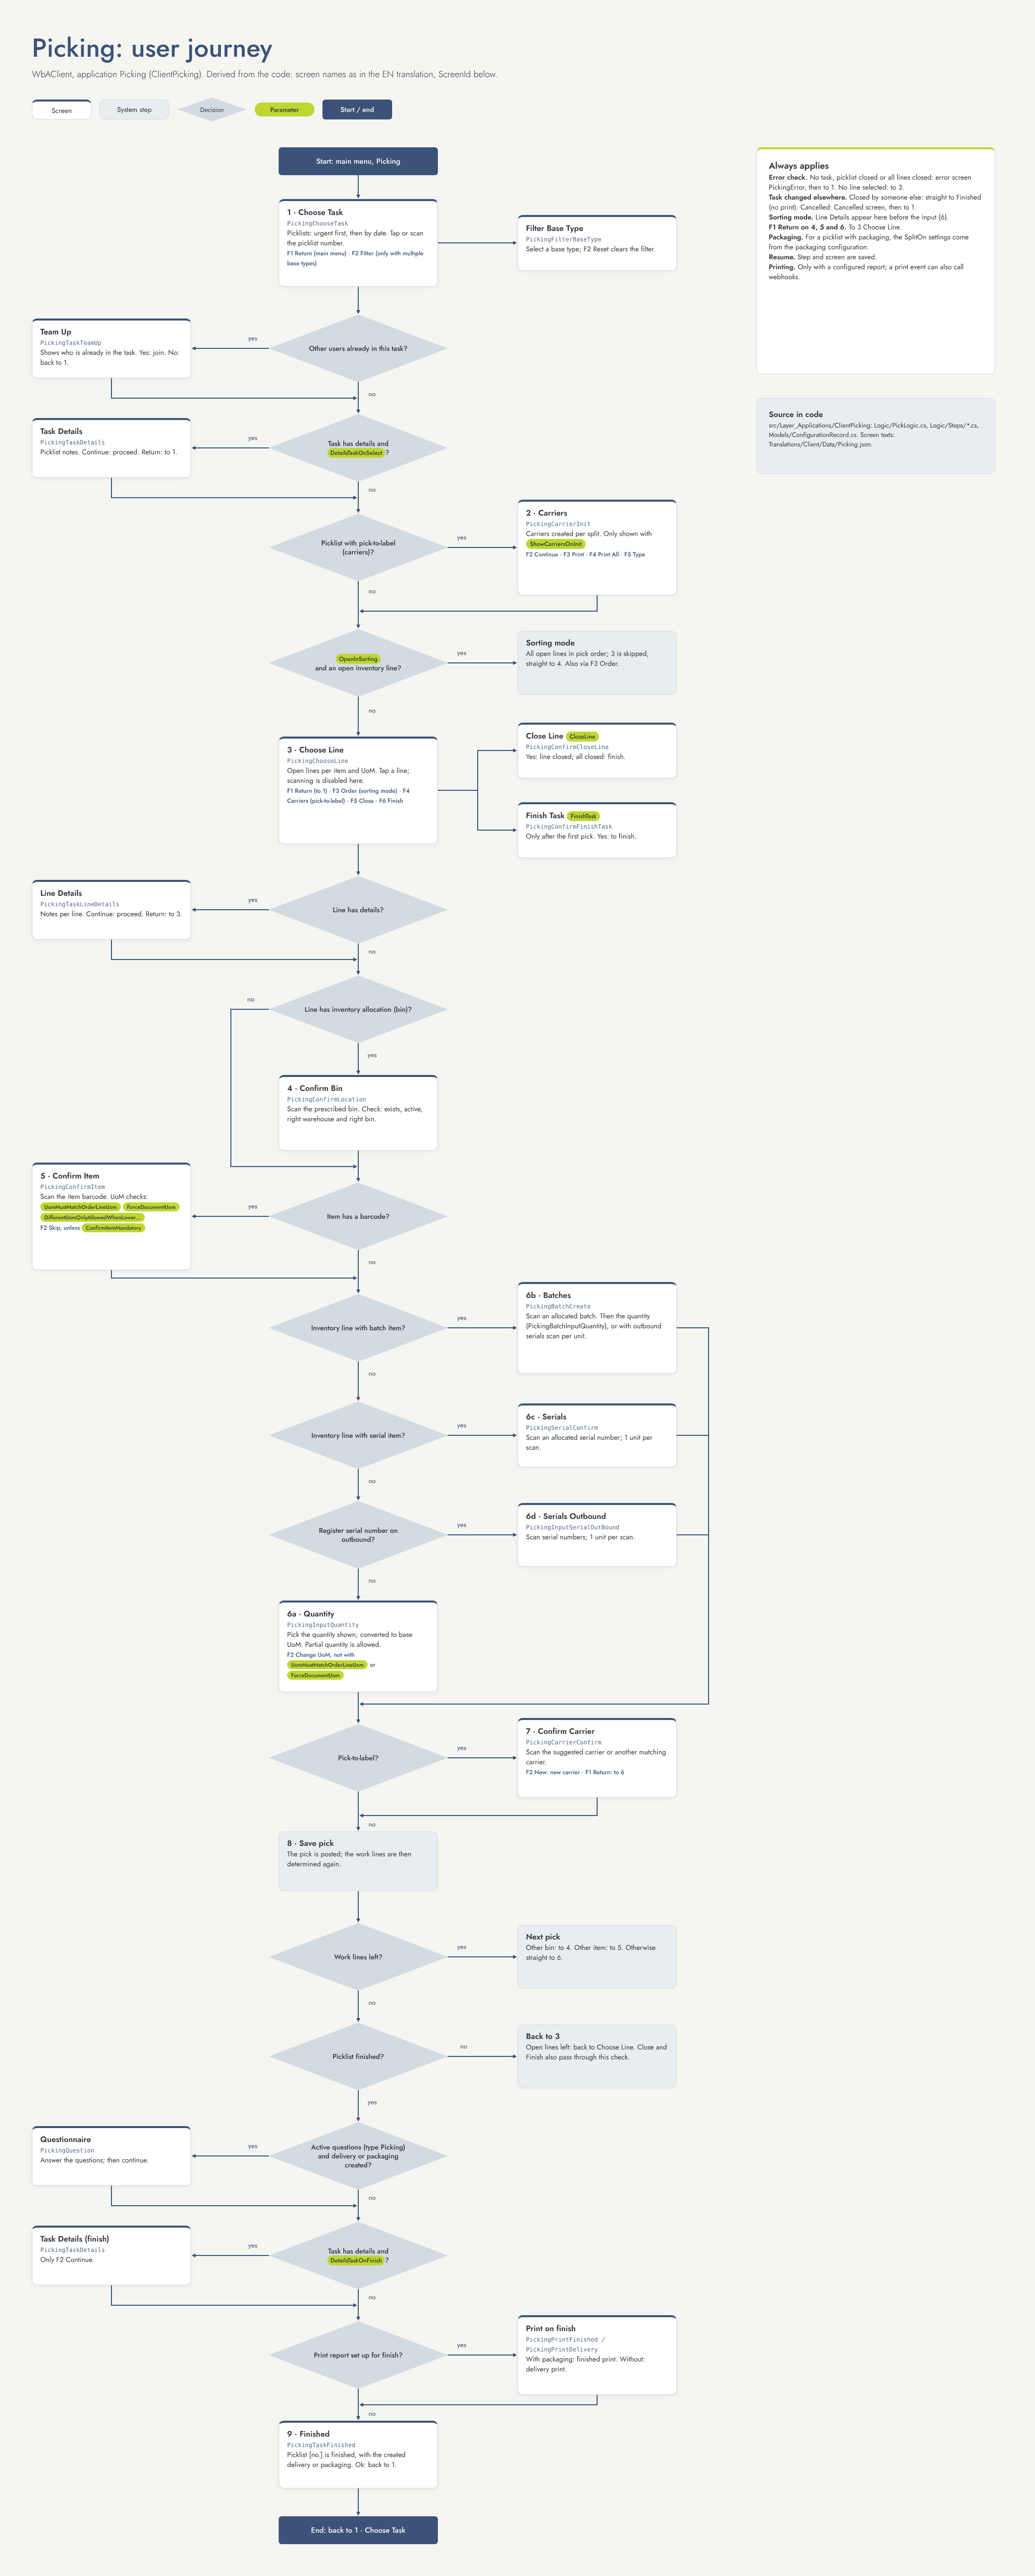
Settings that change this flow
|
Setting |
Default |
Effect |
Step |
|---|---|---|---|
|
DetailsTaskOnSelect |
On |
Show pick list details after choosing a pick list, when it has notes. |
1 |
|
ShowCarriersOnInit |
Off |
Pick-to-label: show the carriers screen at the start. |
2 |
|
SplitOnDocument, SplitOnBusinessPartner, SplitOnAddress, SplitOnShippingType, SplitOnOwner |
Off |
Pick-to-label: which carriers are created and which carrier is suggested. For pick lists with packaging, these come from the packaging settings. |
2, 7 |
|
OpenInSorting |
Off |
Start straight away in sort mode and skip Choose Line. |
3 |
|
CloseLine |
Off |
Show F5 Close on Choose Line. |
3 |
|
FinishTask |
Off |
Show F6 Finish on Choose Line after the first pick. |
3 |
|
ConfirmItemMandatory |
Off |
When on, the item confirmation cannot be skipped. |
5 |
|
UomMustMatchOrderLineUom |
Off |
The scanned unit must match the unit of the line; hides F2 Change UoM. |
5, 6 |
|
DifferentUomOnlyAllowedWhenLowerThanOrderLineUom |
Off |
Another unit is only allowed when it does not contain more pieces than the open quantity. |
5 |
|
ForceDocumentUom |
Off |
Any barcode of the item is accepted, but you always pick in the unit of the document; hides F2 Change UoM. |
5, 6 |
|
DetailsTaskOnFinish |
Off |
Show the pick list details again when it is finished. |
9 |
Other things that change the flow
-
Pick list options: pick-to-label (carriers) and packaging.
-
Item settings: barcodes, batch, serial, serial number on delivery and number of units.
-
Questionnaire: active questions of type Picking are asked when the pick list is finished.
-
Print reports: carrier, finished and delivery prints only appear when a report is set up.