
With Goods Receipt you receive goods on incoming documents, such as purchase orders. You choose a document, pick the line you are receiving, confirm the item and location, and enter the quantity, batch or serial number.
Step by step
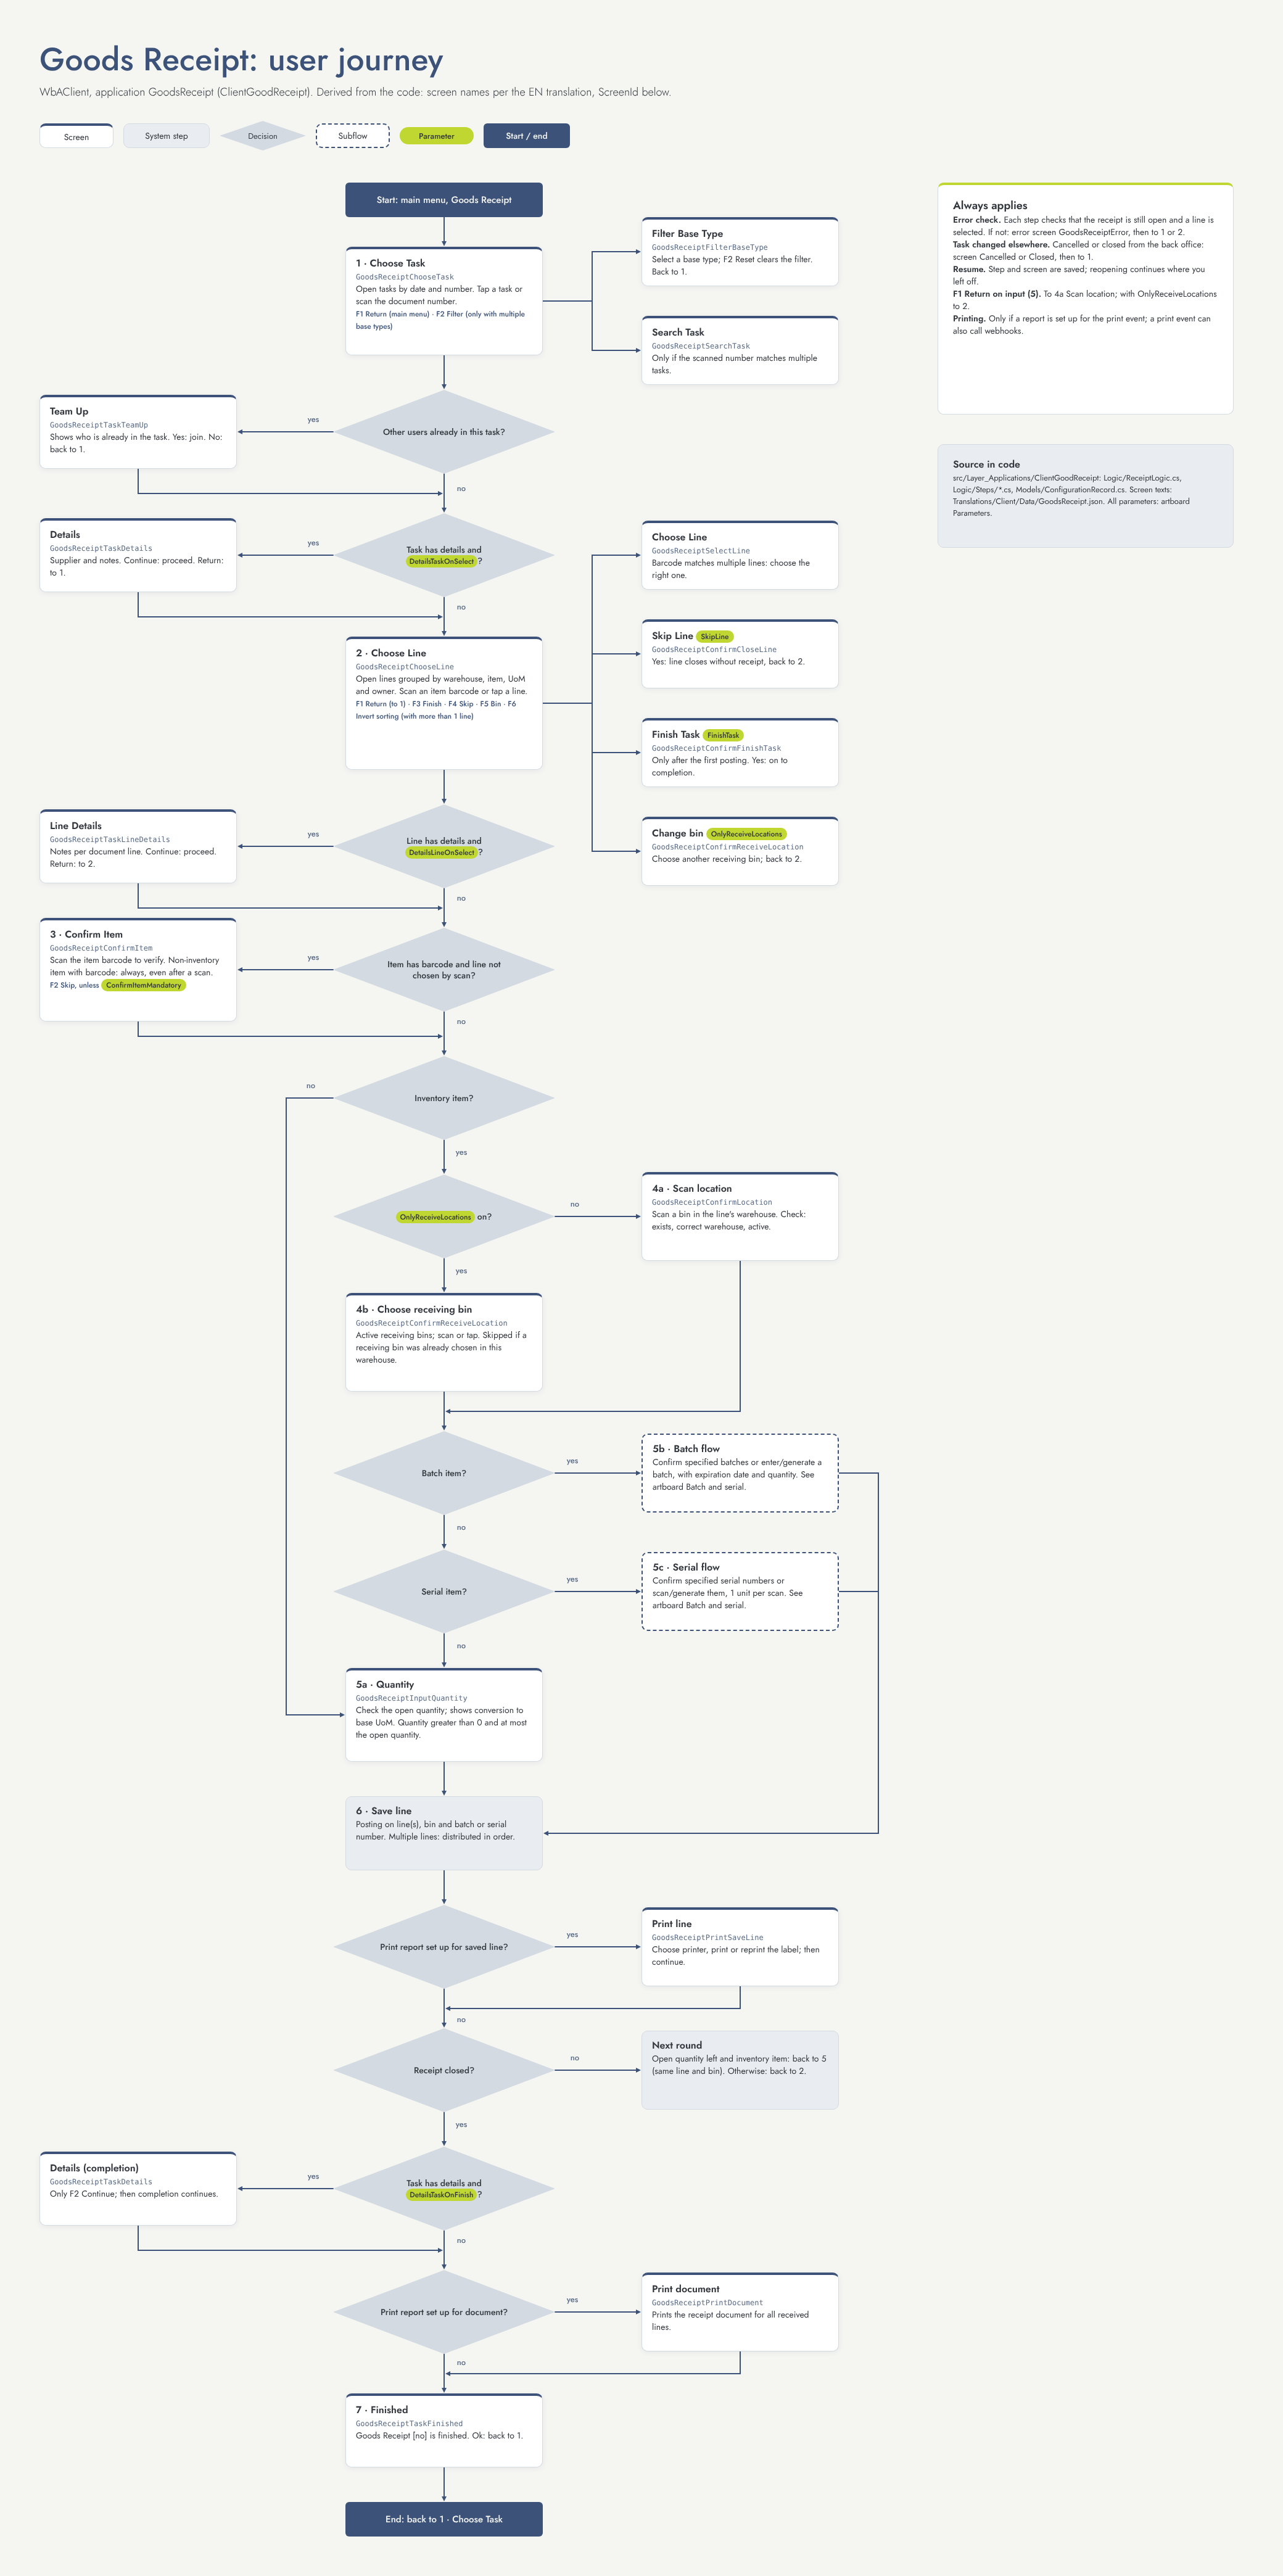
1. Choose Task (screen Goods Receipt - Choose Task) The list shows the open documents, sorted by date and number. Tap a document or scan its number.
-
F2 Filter appears when your task groups contain more than one base type. Choose a base type to filter the list; Reset clears the filter.
-
When a scanned number matches more than one document, the Search Task screen lets you choose the right one.
-
When someone else is already working on the document, you can team up.
-
When the document has notes, the Details screen shows them first. Continue goes on, Return goes back to the list.
2. Choose Line (screen Goods Receipt - Choose Line) The open lines are grouped per warehouse, item, unit and owner. Scan an item barcode or tap a line. When a barcode matches several lines, you choose the right line.
-
F4 Skip: close the selected line without receiving it (after confirmation).
-
F3 Finish: finish the document early. Available after the first receipt.
-
F5 Bin: choose another receiving location for the whole document.
-
F6 Invert sorting: reverse the order of the lines.
-
When the line has notes, the Line Details screen shows them first.
3. Confirm Item (screen Goods Receipt - Confirm Item) Scan the item barcode to confirm you have the right item. This screen appears when the item has a barcode and you tapped the line instead of scanning it. F2 Skip skips the confirmation, unless confirmation is mandatory.
4. Location For stock items you choose where you put the goods.
-
Goods Receipt - Bins: scan any active location in the warehouse of the line.
-
When only receiving locations are allowed, you choose a receiving location from a list. The application remembers it for the next lines in the same warehouse. Items that are not kept in stock skip this step.
5. Quantity, batch or serial number
-
Goods Receipt - Quantity: check the open quantity and enter the quantity received. The screen also shows the conversion to the base unit.
-
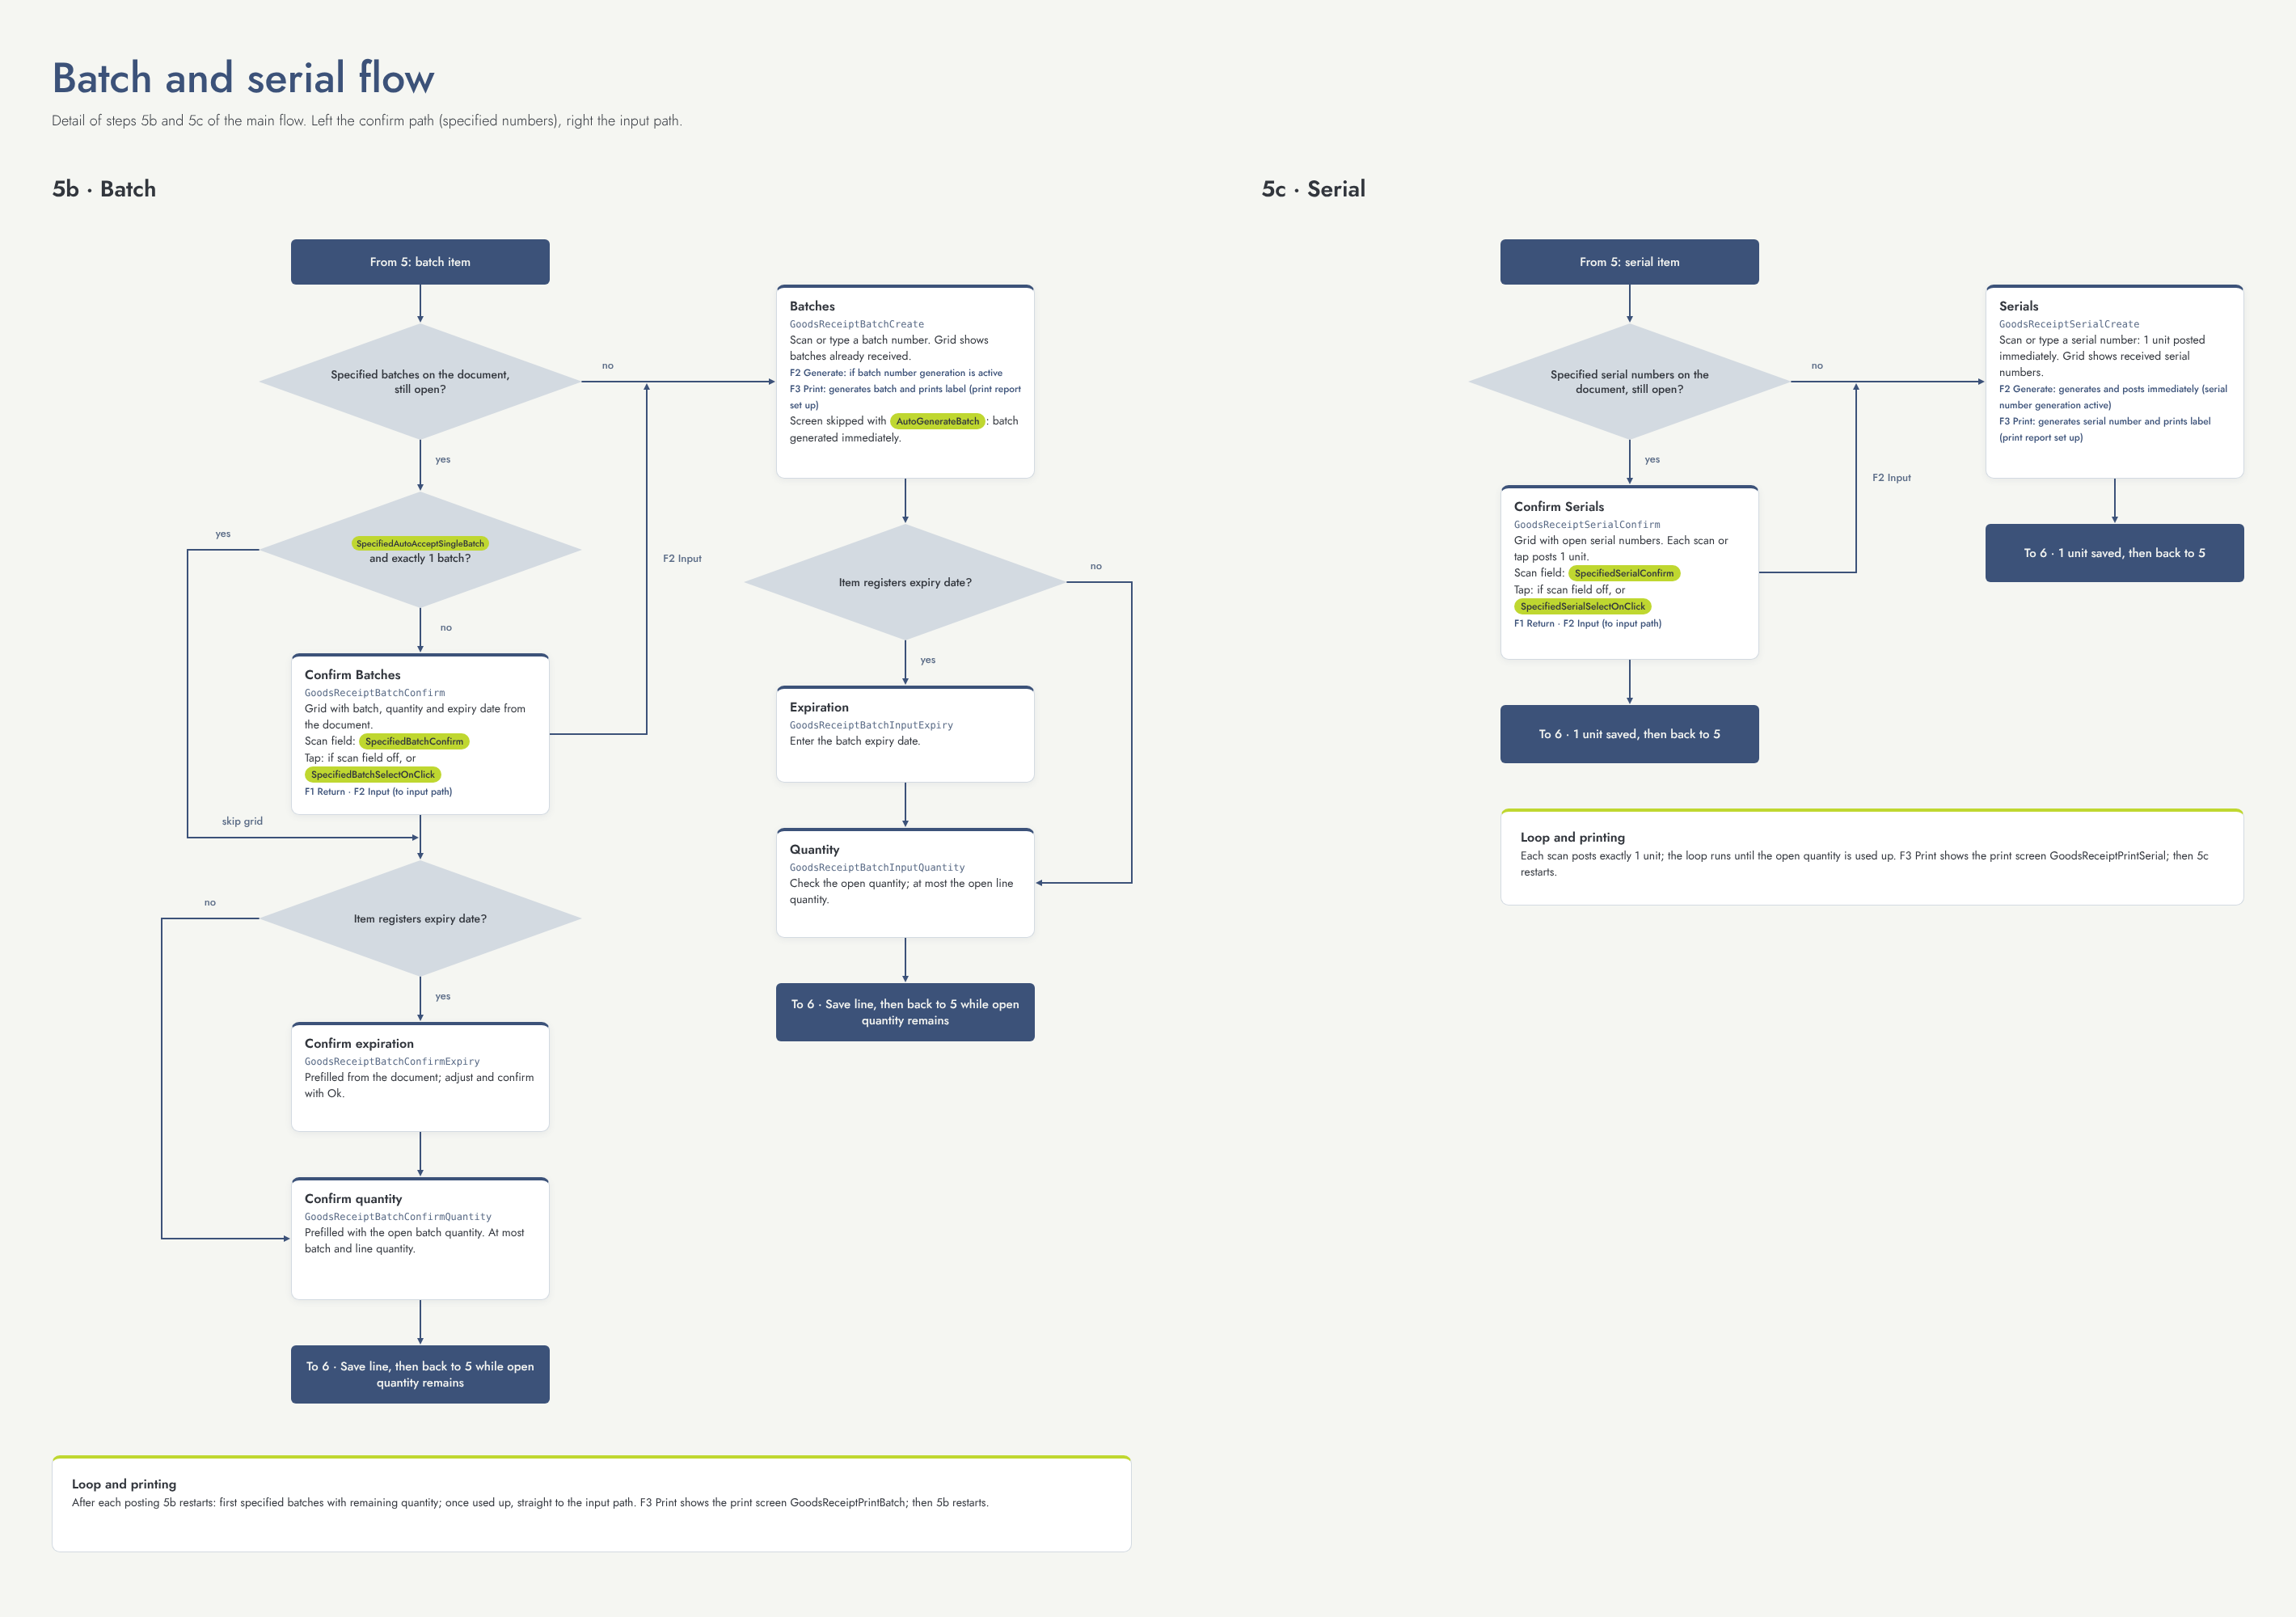
Batch items: when the document specifies batches, you confirm one of those batches (Confirm Batches); otherwise you scan or type a batch number (Batches), or press F2 Generate. Then enter the expiry date (when the item registers it) and the quantity.
-
Serial items: when the document specifies serial numbers, you confirm one of them (Confirm Serials); otherwise you scan, type or generate a serial number (Serials). Each serial number is one piece.
-
F3 Print on the batch and serial screens generates a number and prints its label.
6. Save line The receipt is booked. When a report is set up, you can print a label for the line. When the line still has an open quantity, you continue with step 5 for the same line and location; otherwise you go back to step 2.
7. Finished (screen Goods Receipt - Finished) When the document is complete, the application can show the document details once more, print the document, and then confirms that the goods receipt is finished. Ok takes you back to step 1.
Flow diagram
Batch and serial flow
Settings that change this flow
|
Setting |
Default |
Effect |
Step |
|---|---|---|---|
|
DetailsTaskOnSelect |
On |
Show document details after choosing a document, when it has notes. |
1 |
|
SkipLine |
On |
Show F4 Skip on Choose Line. |
2 |
|
FinishTask |
Off |
Show F3 Finish on Choose Line after the first receipt. |
2 |
|
DetailsLineOnSelect |
On |
Show line details after choosing a line, when it has notes. |
2 |
|
ConfirmItemMandatory |
Off |
When on, the item confirmation cannot be skipped. |
3 |
|
OnlyReceiveLocations |
Off |
When on, only receiving locations can be used, chosen from a list and remembered per warehouse; F5 Bin changes it. |
2, 4 |
|
SpecifiedAutoAcceptSingleBatch |
Off |
When exactly one batch is specified, it is selected automatically. |
5 |
|
SpecifiedBatchConfirm |
On |
Show a scan field to confirm a specified batch. When off, tap the batch in the list. |
5 |
|
SpecifiedBatchSelectOnClick |
Off |
Also allow tapping a specified batch while the scan field is shown. |
5 |
|
SpecifiedSerialConfirm |
On |
Show a scan field to confirm a specified serial number. When off, tap it in the list. |
5 |
|
SpecifiedSerialSelectOnClick |
Off |
Also allow tapping a specified serial number while the scan field is shown. |
5 |
|
AutoGenerateBatch |
Off |
When batch numbering is active, a batch number is generated straight away. |
5 |
|
DetailsTaskOnFinish |
Off |
Show the document details again when the document is finished. |
7 |
Other things that change the flow
-
Item settings: stock item or not, batch, serial, expiry date and barcodes.
-
Number generation for batches and serial numbers: enables F2 Generate and F3 Print.
-
Print reports: print screens only appear when a report is set up.
-
Task groups: which documents you see and whether F2 Filter is available.