Parameters Explained
Introduction
This section describes all configuration options for general WarehousePro settings. In a nutshell, the behavior of the scanner for different Logistic processes can be determined here.
Navigate to Administration > Setup > WarehousePro Settings > Configuration > Settings
Web client settings
The web client can be configured on two types of display settings:
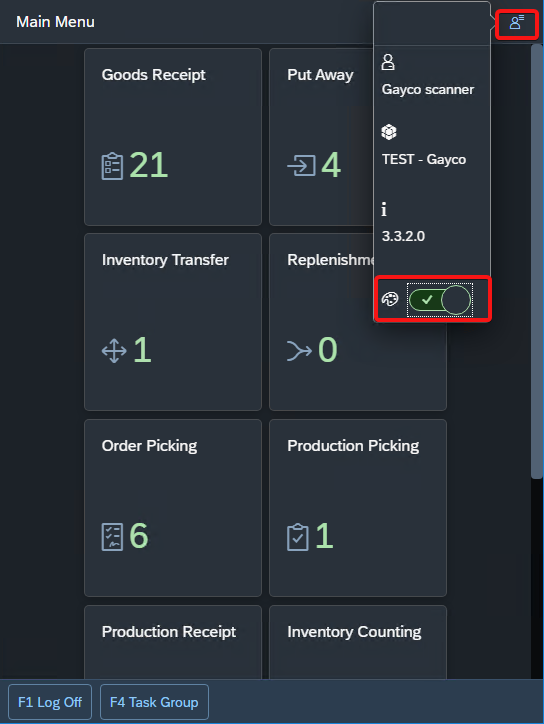
Theme
Font
Theme can be adjusted in dark or light mode. After logging in, click on the account button on right top of the screen as displayed on the picture below.
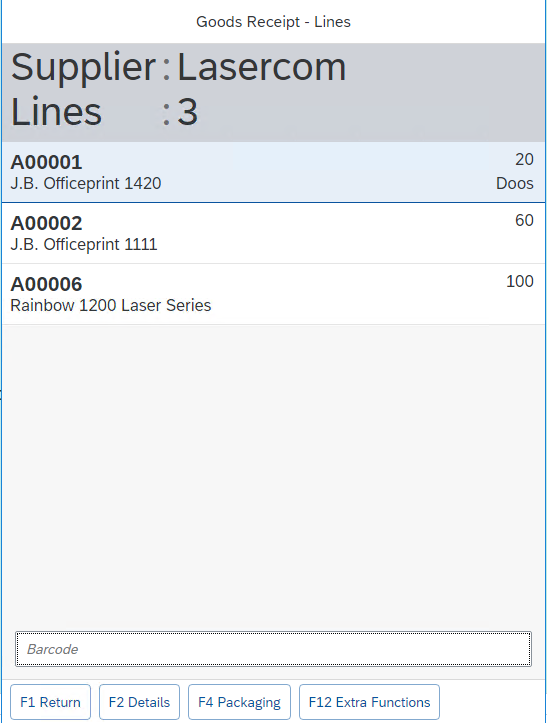
Font of Supplier, customer, item and item lines can be adjusted by typing the following text after the web address of client: http(s)://<server- or ip-adress>:<port>/Sites/<version>/Client/
?fontSize=Xrem or ?fontSize=Xpx
Where X stands for the number of Relative Unit of CSS (rem) or Pixels (px) for the Font size.
For Example 2.5rem will result on scanner like this:
Goods Receipt
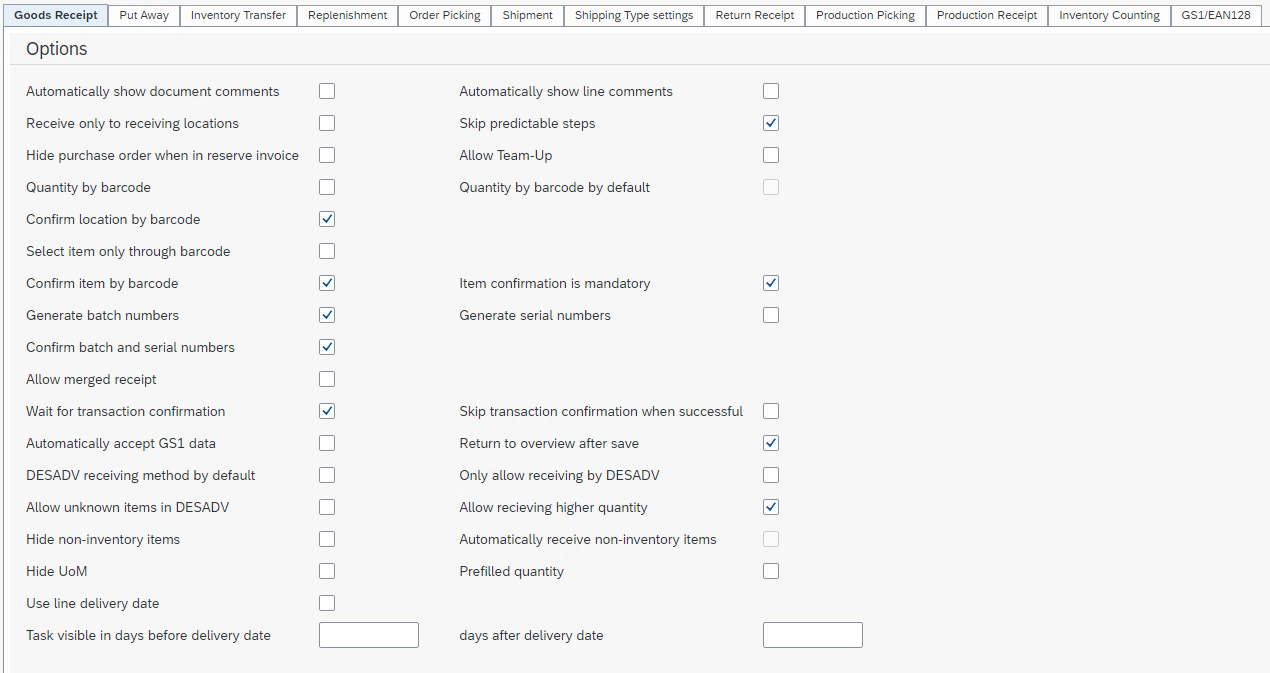
Comments
Automatically show document comments When this option is activated, details like Type, Document number, Supplier, Delivery Date and Remarks are automatically shown before processing. When the option is not activated, it is possible to find the details when clicking the Details button. A icon is visible in the Goods Receipt - Documents menu when the field Remarks is filled in the Purchase Order of SAP Business One.
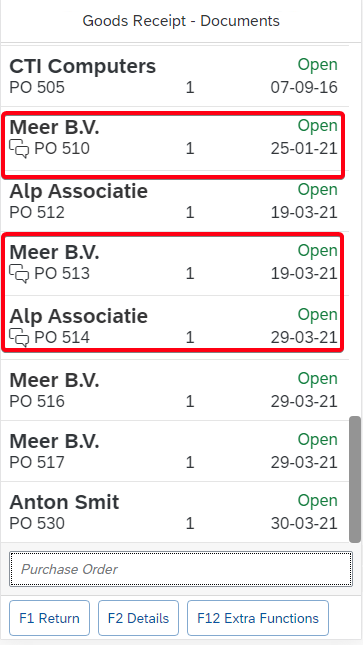
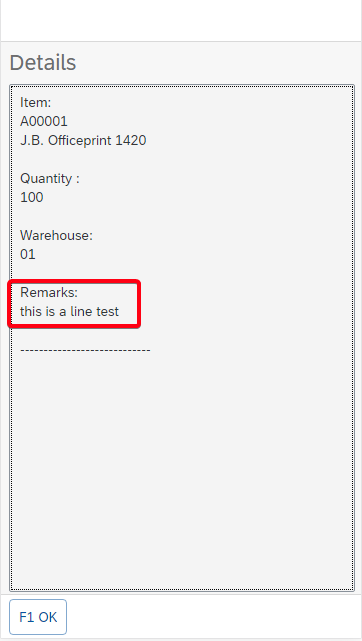
Automatically show line comments When this option is activated, details like quantity, Warehouse and Remarks are automatically shown before processing. When the option is not activated, it is possible to find the details when clicking the Details button. A speech bubble icon is visible in the Goods Receipt - Lines menu when the field Free text is filled in the Purchase Order of SAP Business One.
Receive only to receiving locations
Goods can only be moved to receiving marked bin locations as configured in SAP Business One. Other locations will not be visible in the scanner.
Skip predictable steps
Several steps where choices can be made will be skipped Goods Receipt process.
Barcode
Quantity by barcode
When activated, it is possible to scan barcode Items per item. It is also possible to fill in the fully received quantity.
Quantity by barcode by default
When activated, it is only possible to scan barcode Items per item.
Select only through barcode
When enabled, an item must be validated by scanning a valid barcode for this item. Entering the Item’s Item Code will not be allowed.
Batch / serial numbers
Generate batchnumbers When activated, an option Button will be visible to generate automatically a batchnumber for batch managed items.
Generate serial numbers When activated, an option Button will be visible to generate automatically, per item, a serial number for serial managed items.
Hide purchase order when in reserve invoice
When a purchase order has been partially copied to a reserve invoice, the open Purchase orders will not be visible on the task list.
Allow Team-Up
Gives the option to coöp when processing a goods receiving order (task).
Barcodes
Quantity by barcode When activated, it is possible to scan barcode Items per Unit of Measurement of the item. It is also possible to fill in the fully received quantity.
Quantity by barcode by default When activated, it is only possible to scan barcode Items per per Unit of Measurement of the item.
Confirm location by barcode The location has to be confirmed.
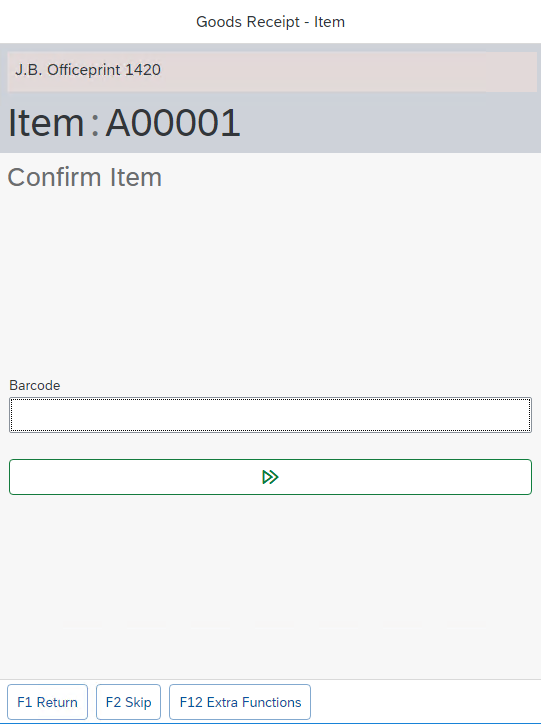
Confirm item by barcode When a barcode item is selected, the barcode has to be confirmed.
Item confirmation is mandatory When a barcode item is selected, the barcode must be confirmed.
When disabled, barcode scanning can be skipped.
Allow merged receipt
When activated and configured in User Defined Field at the Business Partner Master Data, it is possible to combine Goods Receipts from different Purchase orders. Click on the Merge button and select supplier(s).
Transaction confirmation
Wait for transaction confirmation When activated, the message Creating Goods Receipt is showed on the screen untill transaction has been confirmed.
Skip transaction confirmation when succesfull When activated, no confirmation screen is showed that transaction has been completed.
Automatically accept GS1 data
Configurations can be made using GS1 standards. When activated, GS1 data is automatically accepted.
Return to overview after save
Returns to overview when line is saved,
DESADV
DESADV is the abbreviation for DESpatch ADVice. This is the electronic version of the paper delivery note. This EDI message contains all information regarding the shipment.
DESADV receiving method by default
When enabled, Goods Receipt by DESADV is default.
Only allow receiving by DESADV
When a purchase Order has been made, only Goods Receipt by DESADV is allowed. This means standard orders cannot be processed by WarehousePro.
Allow unknown items in DESADV
Packaging items that have not been ordered, like packaging items, may be on the list.
Allow receiving higher quantity
When quanity exceeds ordered quantity, a screen apprears to confirm or reject the Goods Receipt.
Hide non-stock items
When non-stock items are in a Purchase order, they will not be visible in the scanner.
Automatically receive non-stock items
When a purchase order contains both stock and non-stock items, the non stock items will be automatically processed (received) within the total order.
Hide UoM
Unit of Measurement of items will not be visible in scanner.
Prefilled quantity
Wen UoM is hided, quantity is prefilled.
Use line delivery date
When enabled, Good receipt tasks based on the line delivery date can be created instead of document delivery date. Line delivery dates and corresponding quantities are visibele in client.
Task visibility
Task visible before delivery date Fill in number of days before delivery date mentioned on the Purchase Order. Leave empty for full range,
Days after delivery date Tasklist Fill in number of days after delivery date mentioned on the Purchase Order. Leave empty for full range.
Put Away
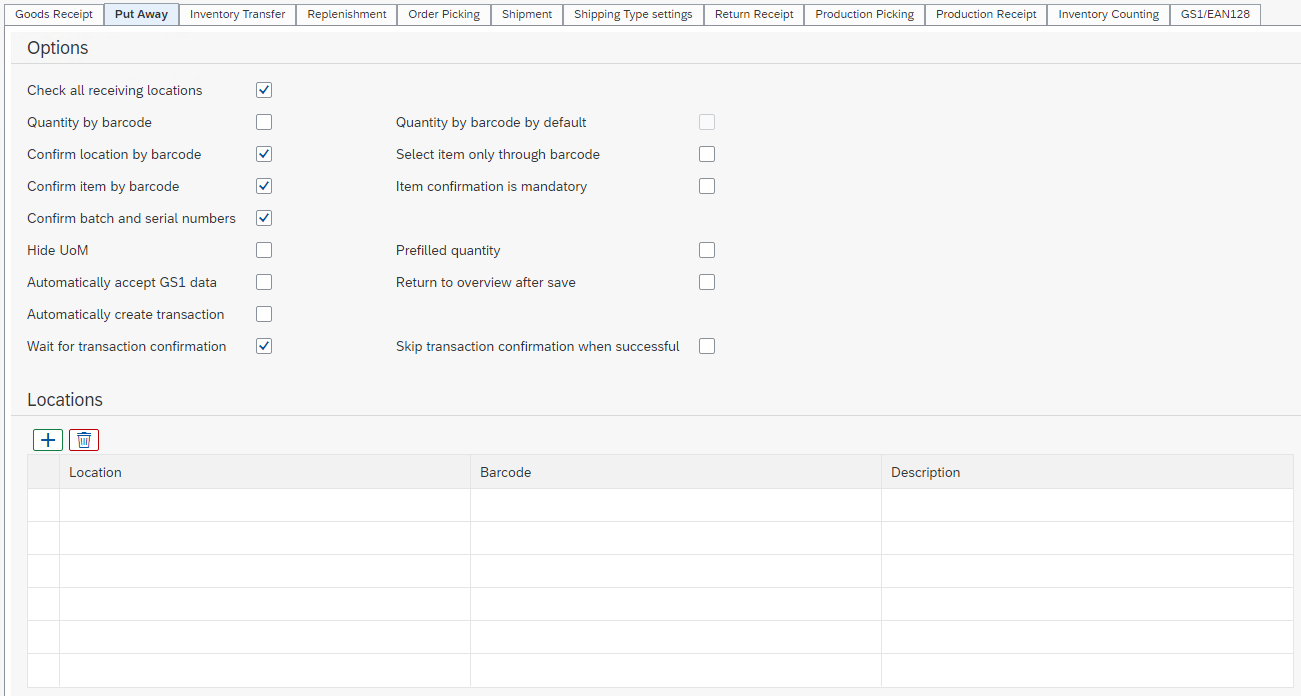
Check all receiving locations
When this option is activated, all bin locations that are defined as a receiving location in SAP Business One, are checked. Optionally, it is possible to check only specific locations that are filled in below (Locations).
Locations filled in below, do not have to be defined as a receiving locations.
Barcodes
Quantity by barcode When activated, it is possible to scan barcode Items per Unit of Measurement of the item. It is also possible to fill in the fully received quantity.
Quantity by barcode by default When activated, it is only possible to scan barcode Items per Unit of Measurement of the item.
Select only through barcode When enabled, an item must be validated by scanning a valid barcode for this item. Entering the Item’s Item Code will not be allowed.
Confirm location by barcode the location has to be confirmed.
Confirm item by barcode When a barcode item is selected, the barcode has to be confirmed.
Item confirmation is mandatory When a barcode item is selected, the barcode needs be confirmed.
When disabled, barcode scanning can be skipped.
Hide UoM
Unit of Measurement of items will not be visible in scanner.
Prefilled quantity
Wen UoM is hided, quantity is prefilled.
Automatically accept GS1 data
Configurations can be made using GS1 standards. When activated, GS1 data is automatically accepted.
Return to overview after save
Returns to Item overview when line is saved.
Automatically create transaction
With this, after each save line (after confirming the number) the changes are automatically booked.
will appear on the scanner when items have been put away successfully.
Skip transaction confirmation when successful
No message will appear on the scanner when items have been put away successfully.
Number of suggested locations
Limits the quantity of suggested bin locations stored in memory.
Wait for transaction confirmation
A message appears on the scanner until transaction has been confirmed.
Inventory Transfer
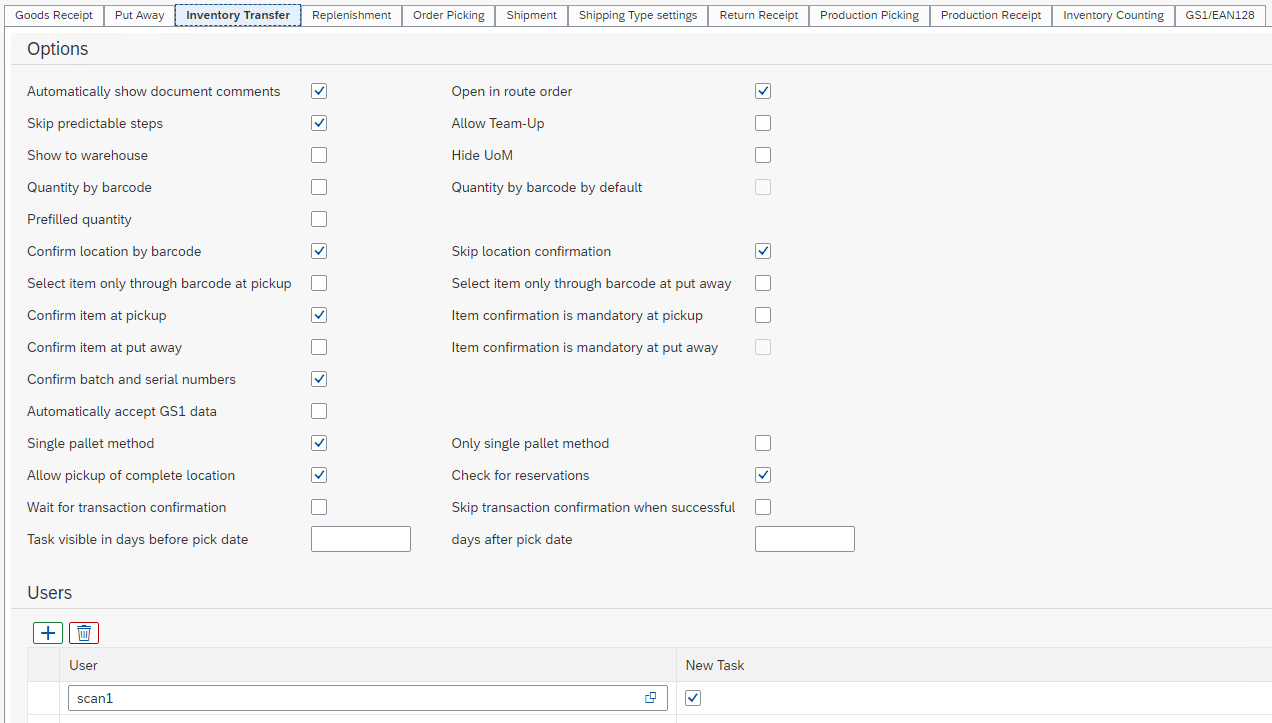
Automatically show document comments
Details like Type, Document number, Supplier, Delivery Date and Remarks are automatically shown before processing. When the option is not activated, it is possible to find the details when clicking the Details button. A icon is visible in the Goods Receipt - Documents menu when the field Remarks is filled in the Purchase Order of SAP Business One.
Automatically accept GS1 data
Configurations can be made using GS1 standards. When activated, GS1 data is automatically accepted.
Single pallet method
When this option is enabled, the client will automatically switch to Put function immediately after picking up an item when in new tasks started from client. The setting is named "Single Pallet method", but this function is not limited to the pallet UoM. It also does not matter how the data is entered. It can be entered by using GS1/EAN128 barcodes or entered manually using the device's keyboard.
Wait for transaction confirmation
A message appears on the scanner until transaction has been confirmed.
Skip transaction confirmation when successful
No message will appear on the scanner when items have been transferred successfully.
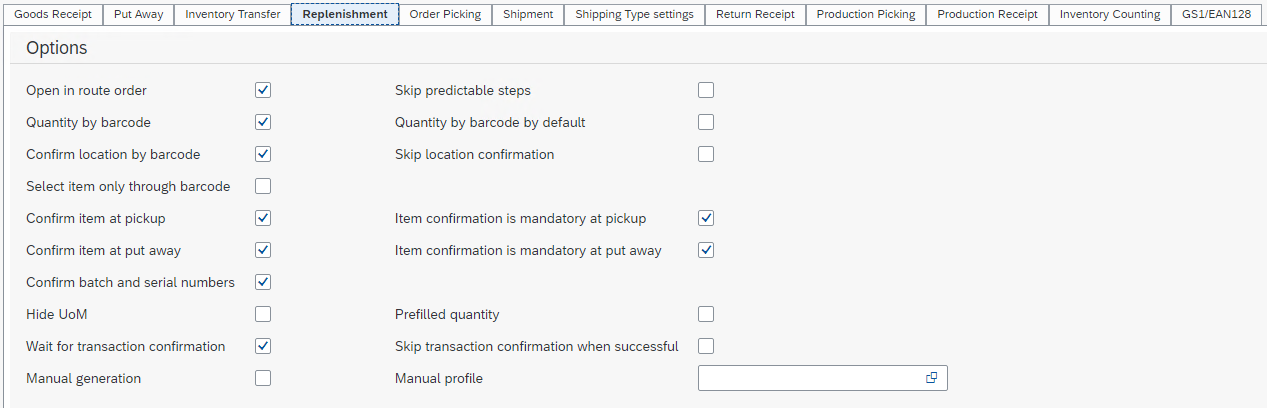
Replenishment
Order Picking

Open in route order
This option sorts items on a picklist on a certain logic route. It also makes option "F6 Park" available to park items on a PickList one-time during picking process. This is only possible in case there are more than one item and is not applicable for the last item on the Picklist.
Show route list
When this option is enabled a list of routes contained in the picklist will be showed.
Pick by carrier
When this option is enabled, the order picking process will split quantity, to pick for a single item on a single bin location for multiple carriers, into multiple instructions.
Allow partial completion
When this option is enabled, the user has the option to partially complete the picklist without having to cancel all remaining open lines manually. All remaining lines will be closed and need to be added to a new picklist when delivery is still required.
Shipment
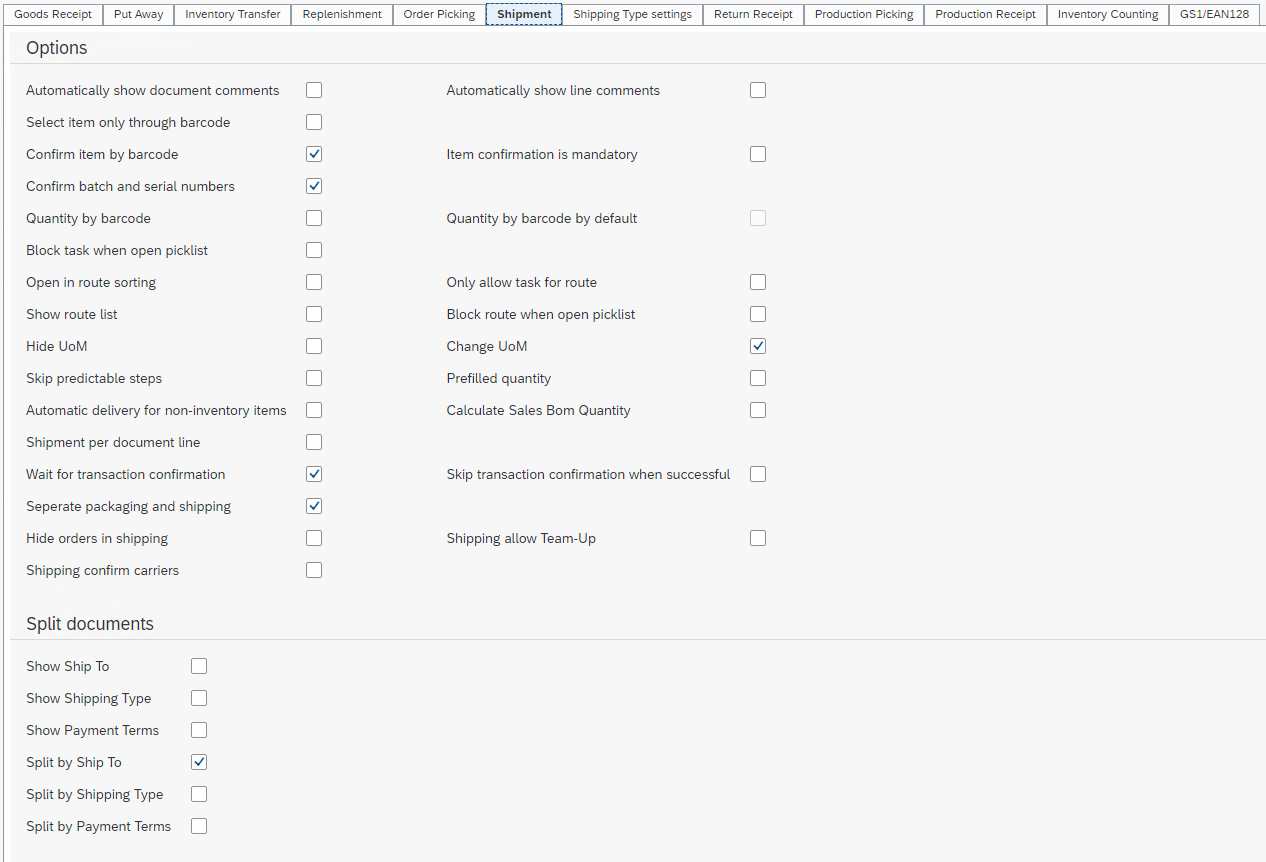
Show route list
When this option is enabled a list of routes contained in the shipment will be showed.
Shipping Type settings

Request package weight When enabled, finalizing the package will ask the user to enter the weight of the package.
Request tracking number When enabled, finalizing the package will ask the user to enter the tracking number for the package. Tracking number must be unique per task.
Return Receipt
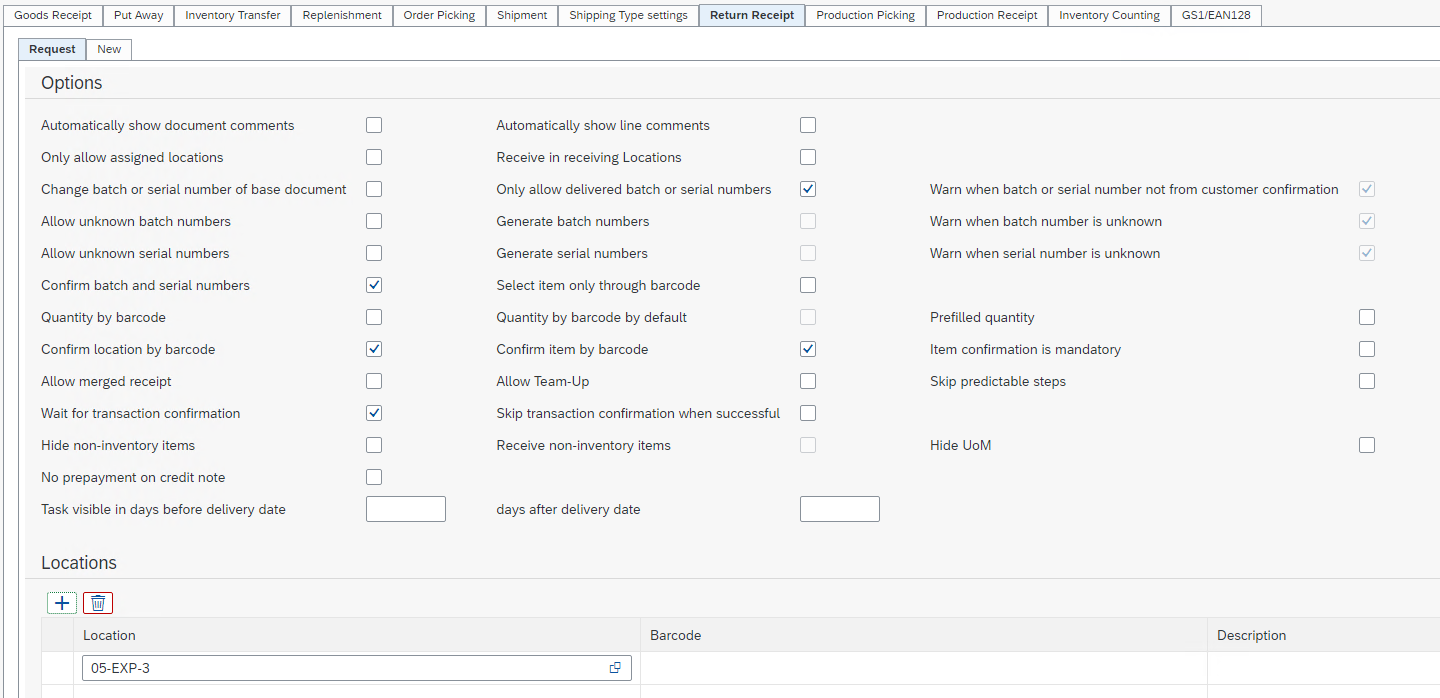
No prepayment on credit note
When WarehousePro creates credit notes based upon a return requests, prepayments are linked. When this option is activated, prepayments will be set to zero.
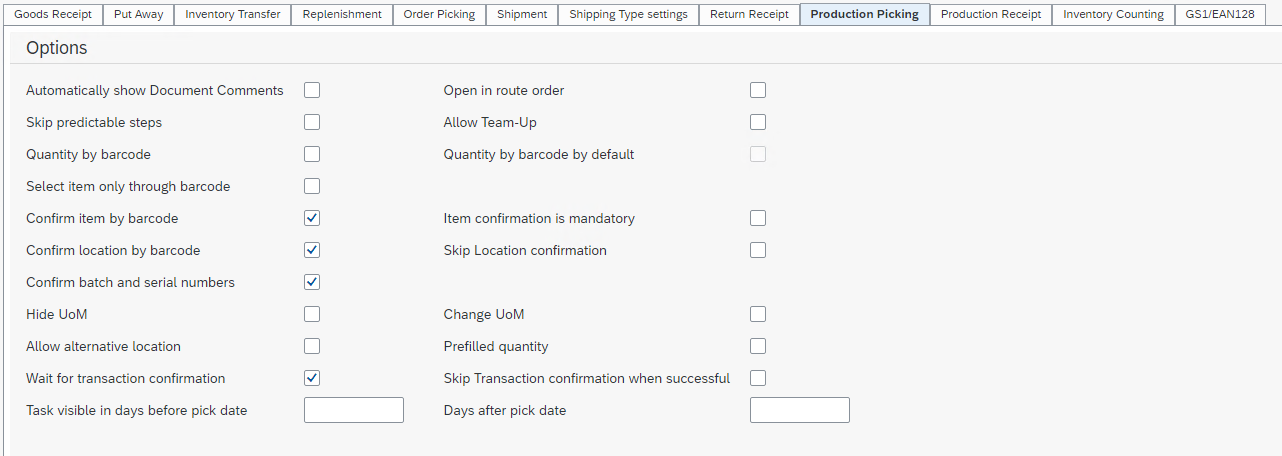
Production Picking
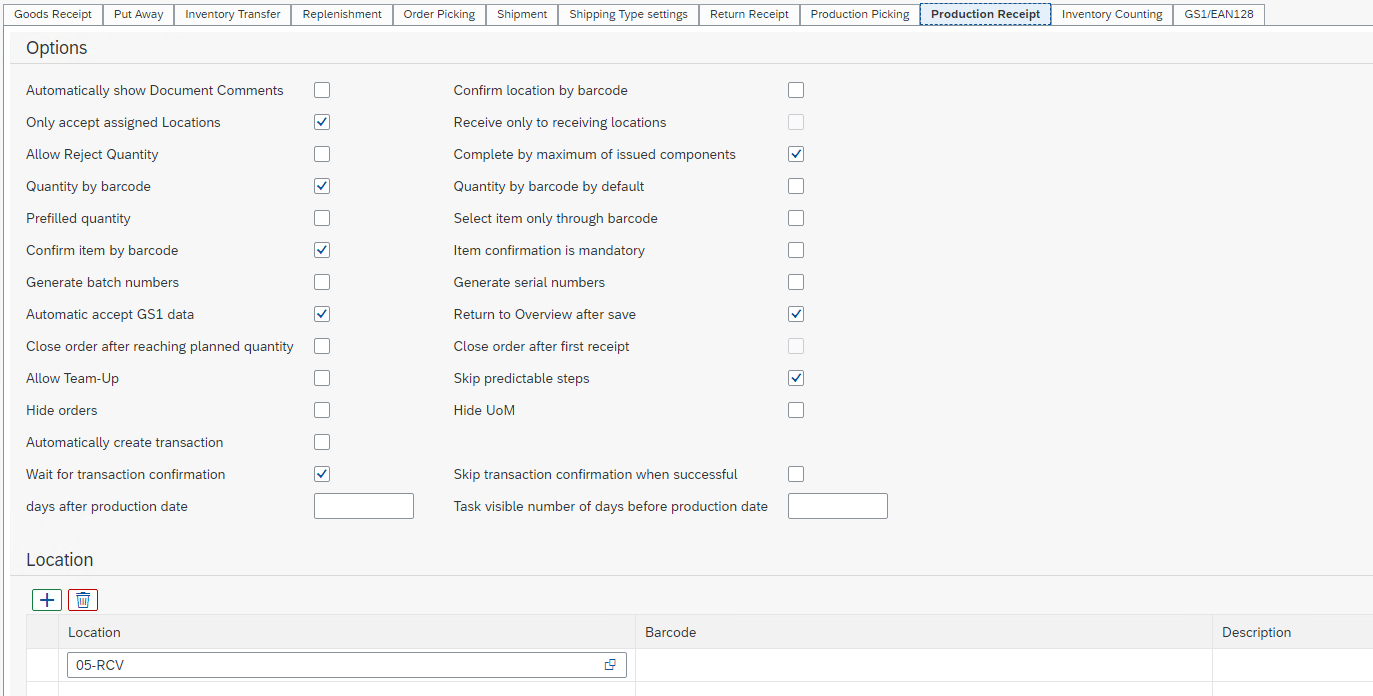
Production Receipt
Inventory Counting
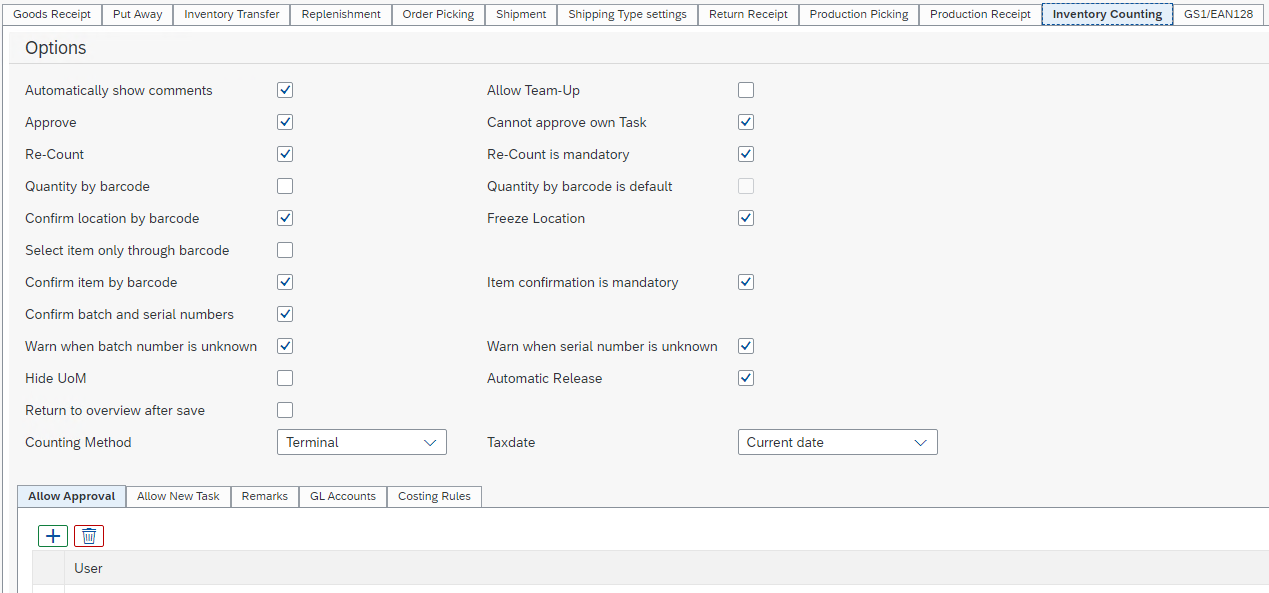
Return to overview after save
After entering the quantity of a stock inventory, the user can again enter a quantity for it. In the case of manual entry you can automatically return to the item selection screen when this option is activated.
GS1/EAN128
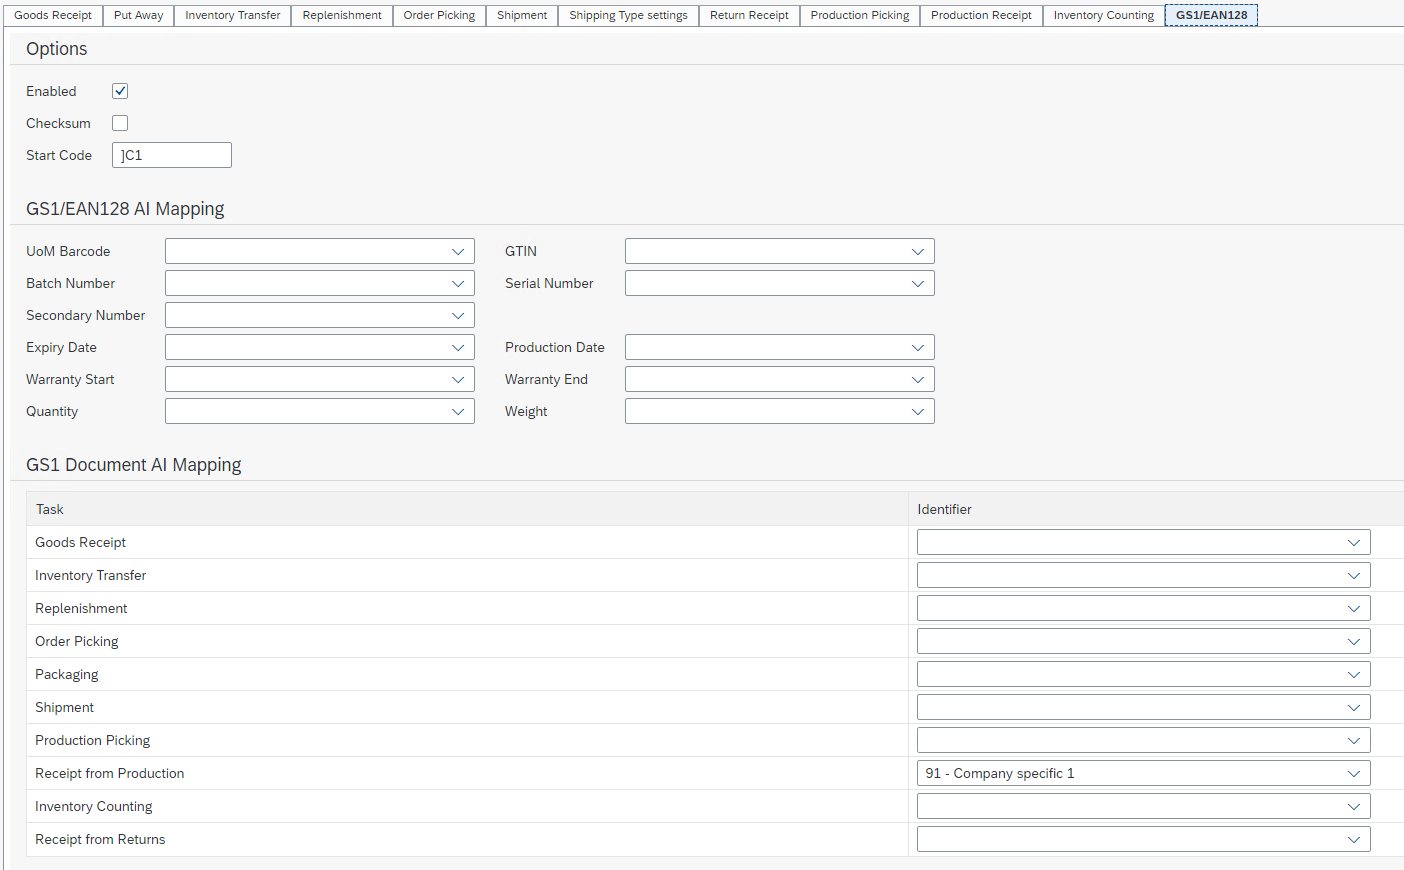
GS1/EAN128 AI Mapping
WarehousePro supports the use of EAN128 type barcodes. Configurations can be made using GS1 standards. Refer to the GS1 website for more details about available Application Identifiers
To be able to use the EAN128 type barcodes the mapping of these Application Identifiers must be set. Settings can be made for all items coming from a single supplier or can be set Item or Item Group specific. When setting this up for Item or Item Groups it is also possible to specify the mapping per warehouse function. For further configuration, see GS1/EAN128 Mapping
For this section however, if the use of EAN128 type barcodes is the standard or even mandatory it is possible to set a default mapping for all items that do not have a specific set of mapping through Item or Item Group specific mapping.
If these defaults are left blank then no EAN128 scanning method will be used for the specific value when requested.
GS1 Document AI Mapping
As from version 3.3.2.1 it is possible to perform document selection via GS1/EAN128 barcodes.
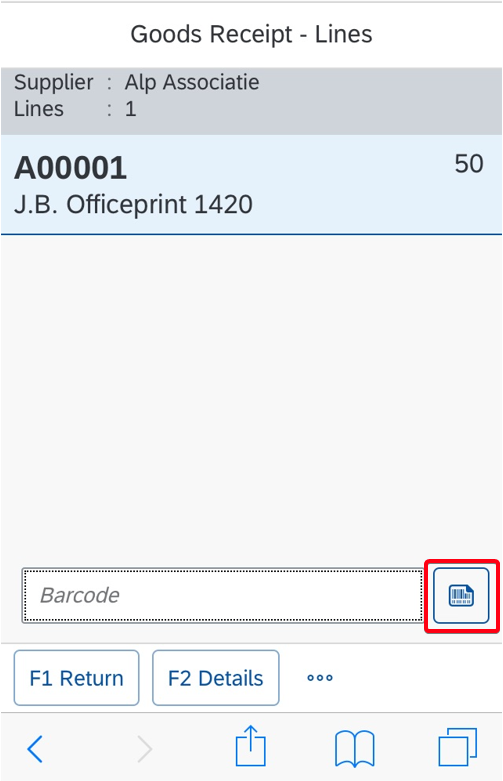
Barcodescanner settings
In order to use Barcodescanner settings for items, first step is to enable the functionality in the WarehousePro Settings > Configuration > Barcodescanner Settings
This function only works with Secure Socket Layer (SSL). Make sure to use an IP port with SSL certificate. For further instructions, consult Installing a new WarehousePro Server instance
When barcode scanner setting is enabled and the device has an integrated camera, the scanner icon will be visible next to the barcode field. This function supports the widest possible range of 1D and 2D barcode types.