
Start and Configure RetailPro Server
Start RetailPro Server
Step | Remark | |
|---|---|---|
| 1 | Start the B1 ProSuite Software Platform application if it is not already running. | |
| 2 | In the menu above, choose Packages > Applications. | |
| 3 | The screen below will be displayed.  |
The status is “Stopped” by default. |
| 4 | Click the “Start” button at the bottom left to start the service.  |
The Status changes to “Running”. The SBO Status in “Busy Connecting”. |
| 5 | Click on the “Refresh” button at the bottom right. The SBO Status changes to “Running”.  |
RetailPro Server Configuration Settings
Step | Remark | |
|---|---|---|
| 1 | Start the B1 ProSuite Software Platform application if it is not already running. | |
| 2 | In the menu above, choose Packages > Applications. | |
| 3 | Select the RetailPro Server to be configured. | |
| 4 | Click on “Open”. 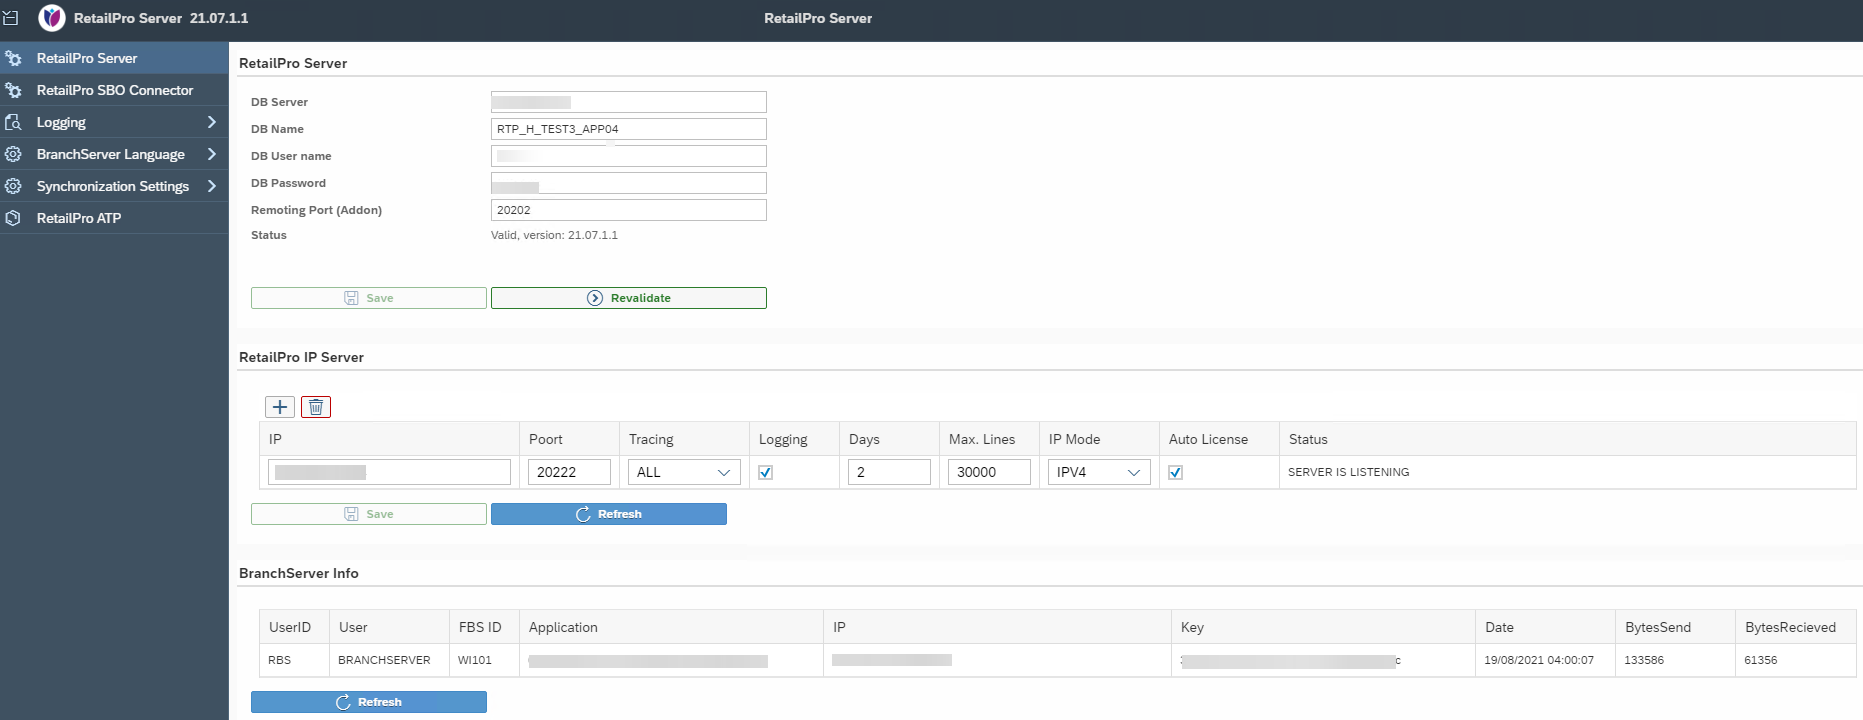 This screen consists of 3 parts: | |
| 5 | RetailPro Server Settings of the SQL database for the RetailPro Service. |
DB Name will be the name of the RetailPro Database. Make sure an unique name is filled in. Do not use the same name as the SAP Business One database. This will cause to break the SAP Business One database!! |
| 6 | RetailPro IP Server Settings for the communication from the Branch Servers to the RetailPro Server. Specify the IP Address and communication port to accept incoming connections from Branch servers. Also specify the desired log levels (none, all, errors or events). |
After save the Status changes to "SERVER IS LISTENING". Other statuses are incorrect. |
| 7 | BranchServer Info All Branch Servers connected to this RetailPro server are shown here. |
New RetailPro Server Database
Step | Remark | |
|---|---|---|
| 1 | The information below must be entered. 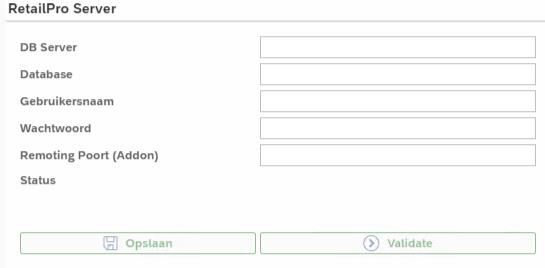 | |
| 2 | DB Server: This should contain the IP address or DNS of the SQL server. | |
| 3 | Database: After entering the DB Server, the new name of the RetailPro Server database is entered here. | |
| 4 | Username: Enter the name of the SQL user. The advice is to create a separate SQL user for this. | |
| 5 | Password: Enter the password of the SQL user. | |
| 6 | Remoting Port (Addon): This is the port the Addon will listen to. Enter a (freely available) port number. |
Advice: use port numbers above 10000. These are usually not used by Windows. |
| 7 | Click on “Save”. | |
| 8 | The message below will appear: 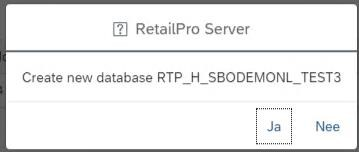 | |
| 9 | Click on “Yes”. | |
| 10 | The screen below is displayed: 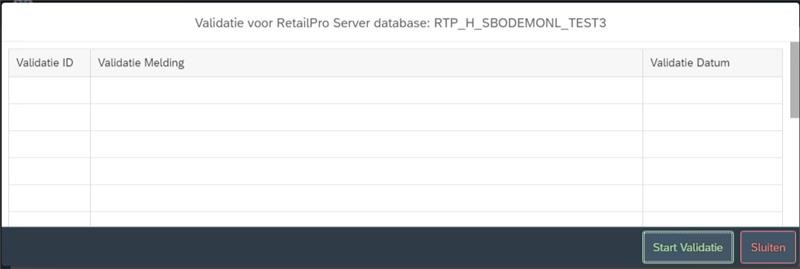 | |
| 11 | Click on “Start Validation”. | |
| 12 | The screen below is displayed: 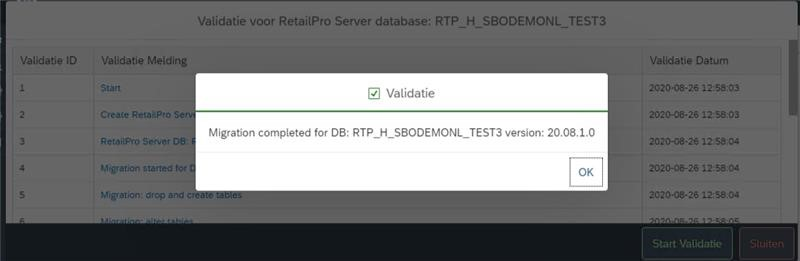 | |
| 13 | Click on “OK”. | |
| 14 | Click on “Close”. |
New RetailPro IP Server
Step | Remark | |
|---|---|---|
| 1 | Enter the information below: | |
| 2 | IP: The IP address of the RetailPro Server for communication with the Branch Servers. | |
| 3 | Port: The port of the RetailPro Server for communication with the Branch Servers. |
This port must be opened in the firewall. This only applies to incoming traffic. |
| 4 | Tracing: Indicate what needs to be followed Only events, only errors or both. | |
| 5 | Logging: Checkmark if there is need tracking logging. | |
| 6 | Days: How long should the logging be stored in the RetailPro Server database. | |
| 7 | IP Mode: Specify the IP Mode of the RetailPro Server. | |
| 8 | Auto License: If checked, a license is automatically assigned when a new Branch Server is registered. Advice is to tick this. | |
| 9 | Click on “Save”. | |
| 10 | The status changes to “SERVER IS LISTENING”.  |
The Status must be SERVER IS LISTENING. Any other Status is incorrect. |
Client Info
In the screen below, all Branch Servers are displayed when they are created and communicating with RetailPro Server.
You do not have to fill in any fields manually here.

After successfully configuring the RetailPro Server, please continue with Installing RetailPro SAP Business One Add-On.